Respond to compromised IAM credentials
Scenario / Problem Statement You have been assigned a GuardDuty finding to investigate and remediate. The GuardDuty finding type is “UnauthorizedAccess:IAMUser/MaliciousIPCaller.Custom”.
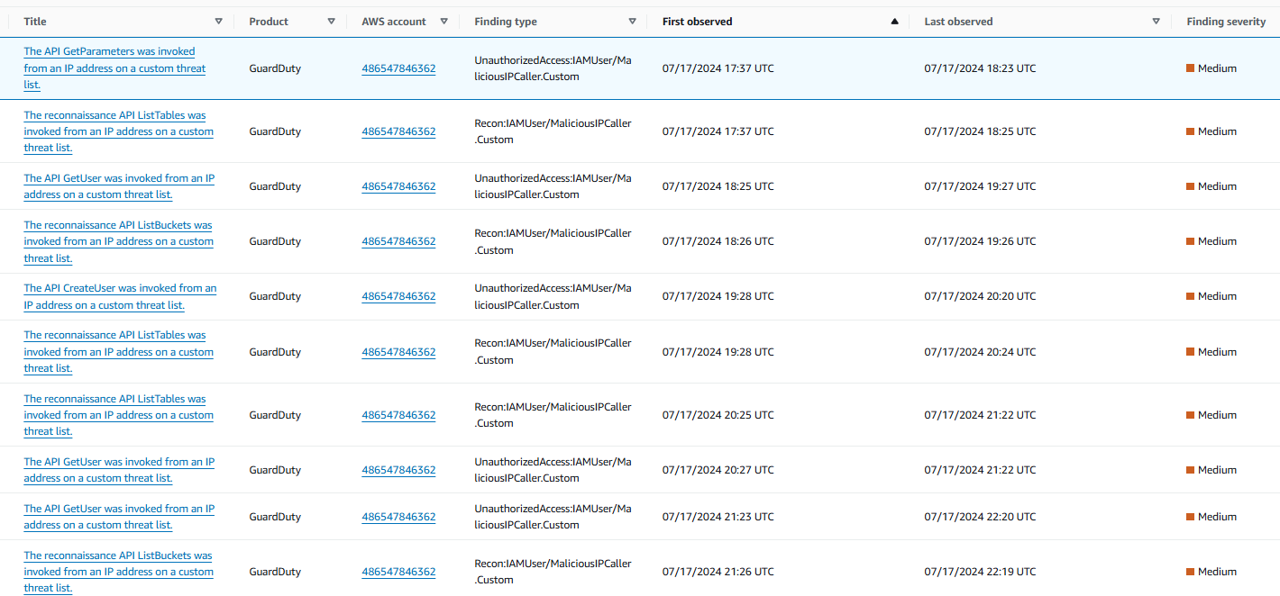
Navigate to the GuardDuty console and open the Findings page. You should see a finding that starts with “UnauthorizedAccess:IAMUser/MaliciousIPCaller.Custom”. If you do not see one, try refreshing the page.
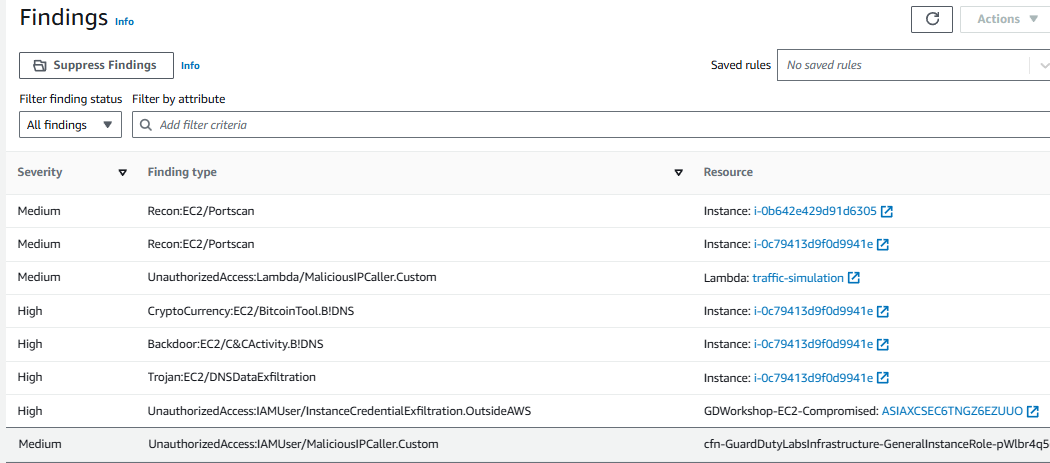
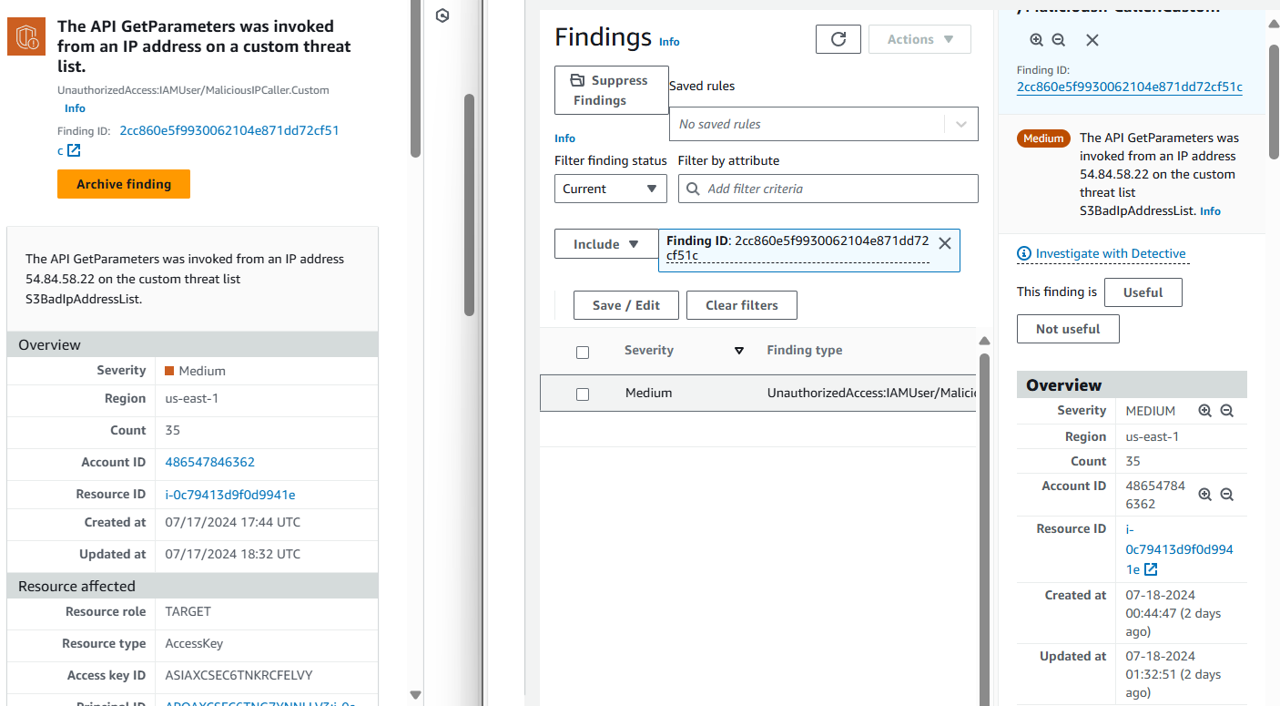
Select a finding with type “UnauthorizedAccess:IAMUser/MaliciousIPCaller.Custom” by clicking the row for that finding. This finding informs you that an API operation (for example, an attempt to launch an EC2 instance, create a new IAM user, modify AWS privileges) was invoked from an IP address that is included on a threat list that you uploaded. A threat list consists of known malicious IP addresses. This can indicate unauthorized access to AWS resources within your environment. As part of a risk driven detection strategy, your organization prioritizes AWS IAM related security alerts.
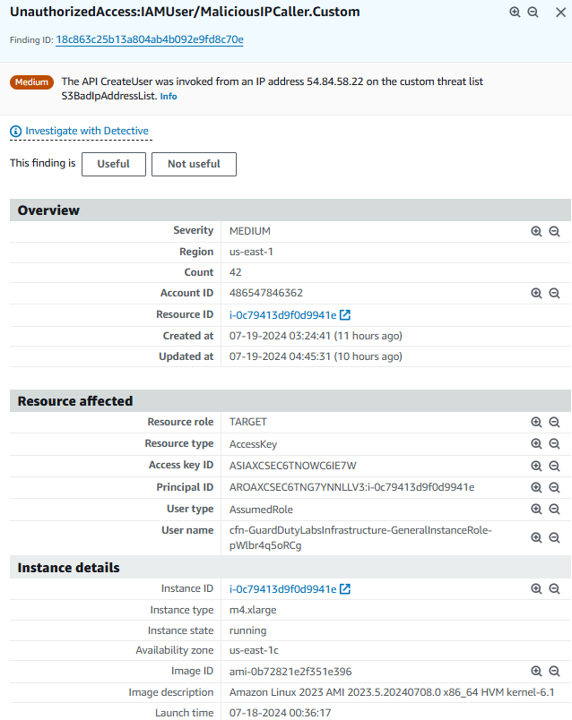
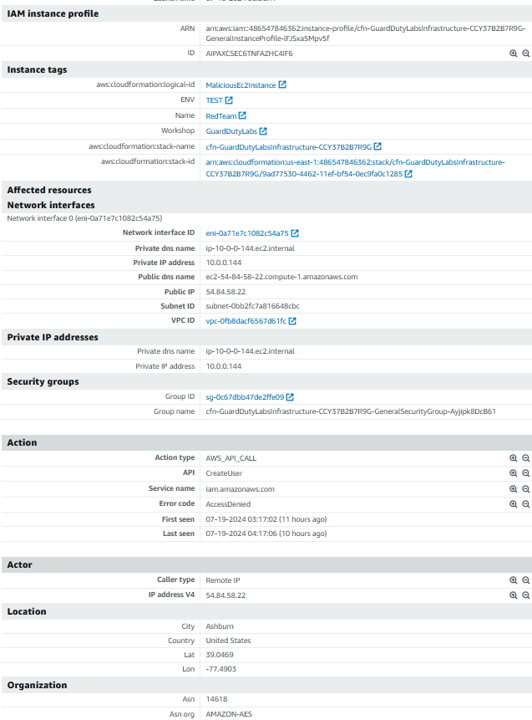
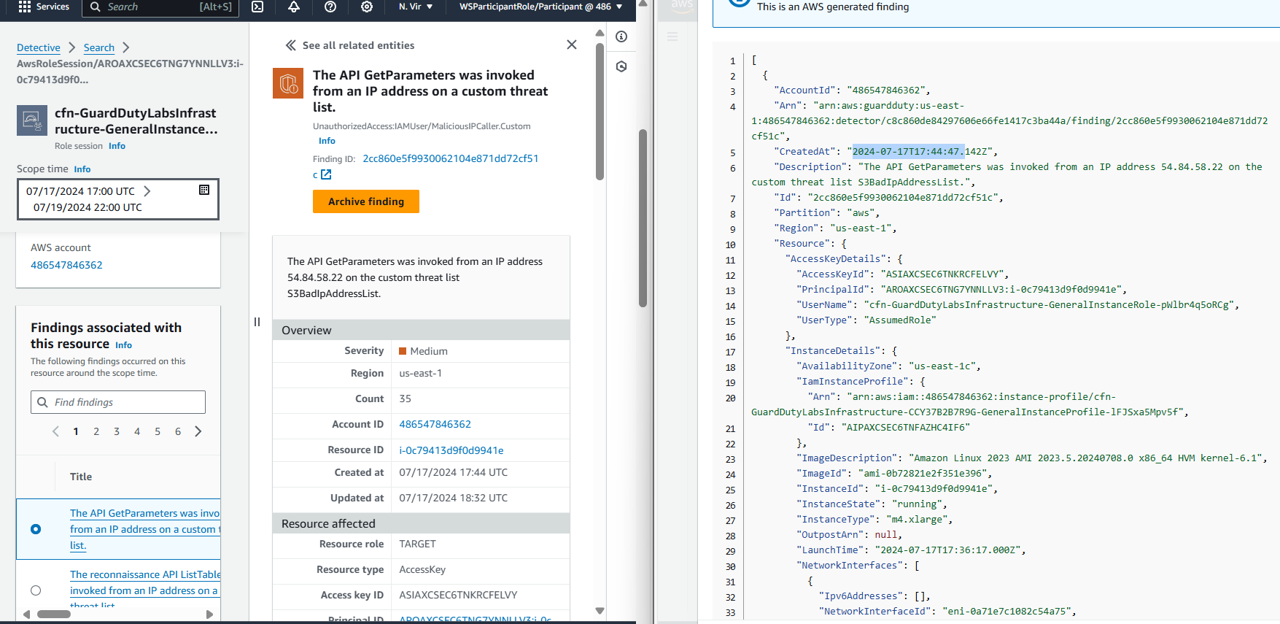
You can see that the access key referenced in this finding is from an IAM assumed role, which means the Access Key credentials used to invoke these API calls belong to an IAM Role assumed by an EC2 instance. Under Instance details in the finding details, you will be able to identify the instance ID of the EC2 instance involved, as well as the IAM role (“User name”) and access key used. Make a note of the instance ID. The instance ID starts with ‘i’ (such as i-08faaaafb15777f5a). We will need this later to identify how credentials were compromised.
Still under Resources affected in the finding details, make a note of the User name name that is assigned to the EC2 instance. This is the IAM Role that the access key belongs to.
Finally, still under Resources affected in the finding details, make a note of the Access key ID.
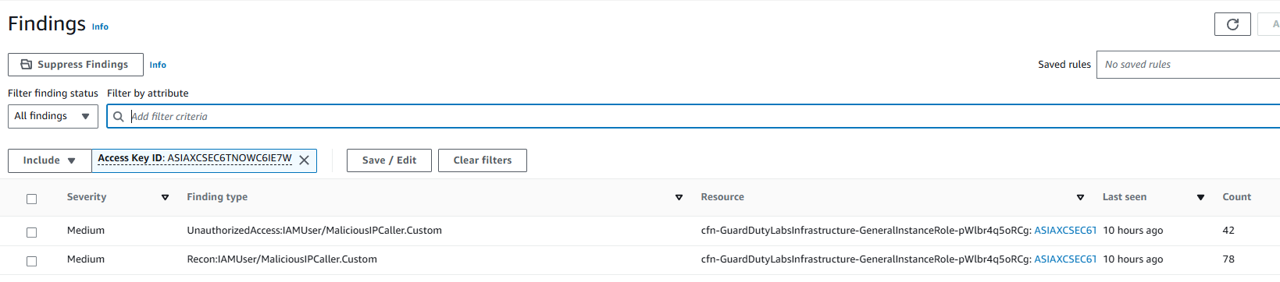
At the top of the Findings page, click the bar to Add filter criteria. Select Access Key ID, paste your access key into the prompt.
Click Apply. This will show you all of the GuardDuty findings related to that access key. If there are other findings, take a minute to investigate them.
Before moving on, make sure you have noted the instance ID, IAM role (“User name”), and access key ID. You will need these values later in this module.
Respond to compromised AWS IAM credentials
Now that you have identified that a temporary security credential from an IAM role for EC2 is being used by an attacker, the decision has been made to rotate the credential immediately to prevent any further misuse or potential privilege escalation. To revoke the IAM role sessions, we need to go to the AWS Identity and Access Management (IAM) console. https://console.aws.amazon.com/iamv2/home
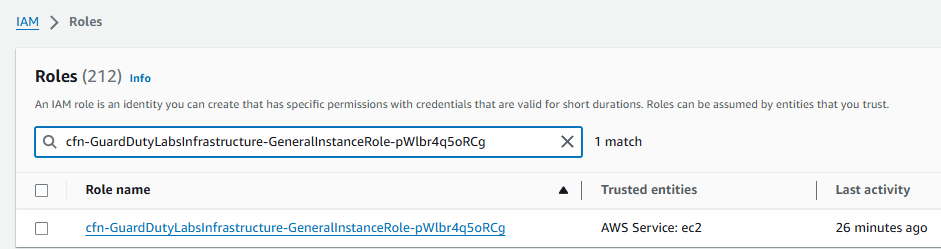
Click Roles on the left and find the role name you identified in the previous section using the User name you copied down earlier (this is the IAM Role attached to the compromised instance). If you don’t see it, you can use the Search field under Roles. Click on that Role Name.
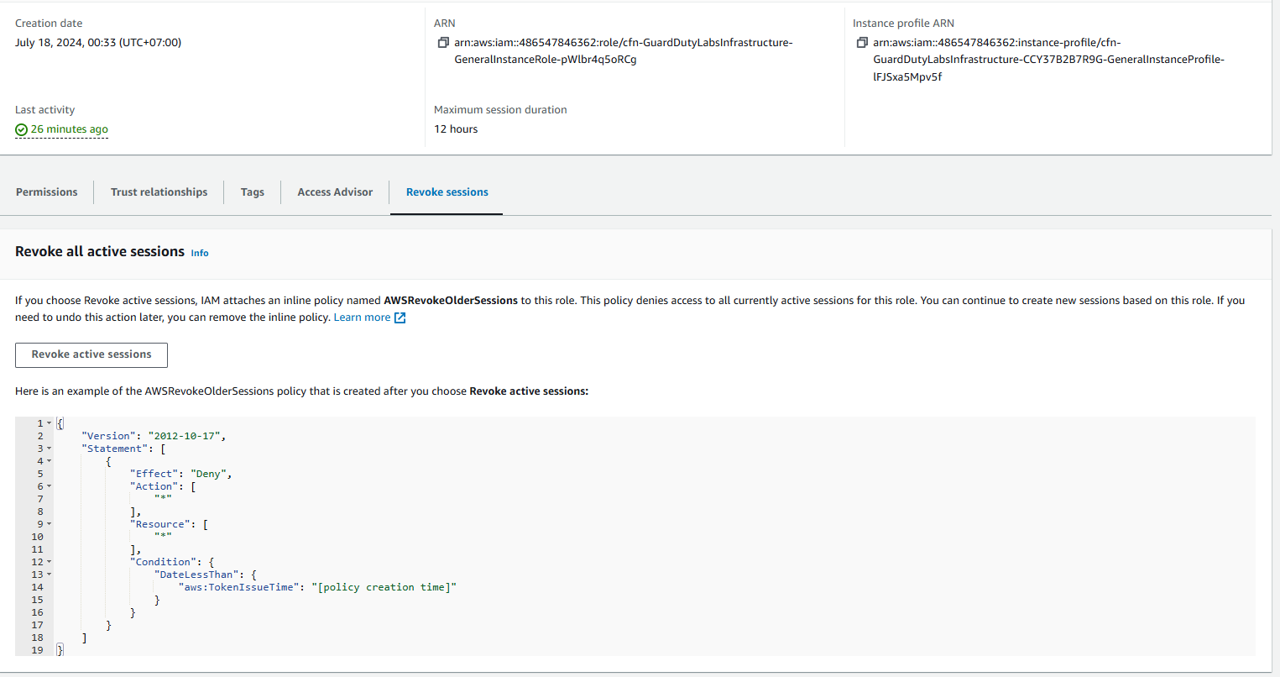
Click on the Revoke sessions tab.
 Then, can not access to the instance.
Click on Revoke active sessions.
Select the acknowledgement check box and then click Revoke active sessions. You will see a banner appear at the top of the page stating “Active sessions have been successfully revoked”.

Restart the EC2 instance to rotate the access keys
All active credentials for the compromised IAM role have been invalidated. This means the attacker can no longer use those access keys, but it also means that any applications that use this role can’t as well. You knew this going in but decided it was necessary due to the high risk of a compromised IAM access key. In order to ensure the availability of your application you need to refresh the access keys on the instance by stopping and starting the instance. A simple reboot will not change the keys. If you waited, the temporary security credential on the instance would be refreshed but this procedure will speed things up. Since you are using AWS Systems Manager for administration on your EC2 instances you can use it to query the metadata to validate that the access keys were rotated after the instance restart.
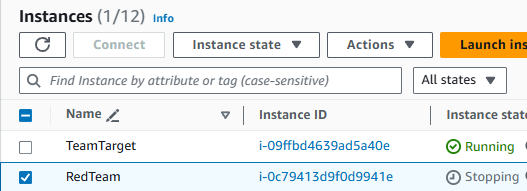
Open the Elastic Cloud Compute (EC2) console and navigate to the Instances page. https://us-east-1.console.aws.amazon.com/ec2/home?region=us-east-1#Instances:instanceState=running
Look for the instance ID that you copied earlier in step 3. Check the box next to that instance.
Then click the Instance state dropdown, and select Stop instance.
A confirmation box will appear. Click Stop again.
Wait for the Instance State to say stopped under Instance State (you may need to refresh the EC2 console). You may need to remove a “running” filter on your list of instances to see the instance listed once it is stopped.
The check the box next to the instance, and follow the same steps to start the instance.
Verify the access keys have been rotated
Go to AWS Systems Manager and open the Session Manager page. https://us-east-1.console.aws.amazon.com/systems-manager/session-manager?region=us-east-1#
Click Start Session on the right.
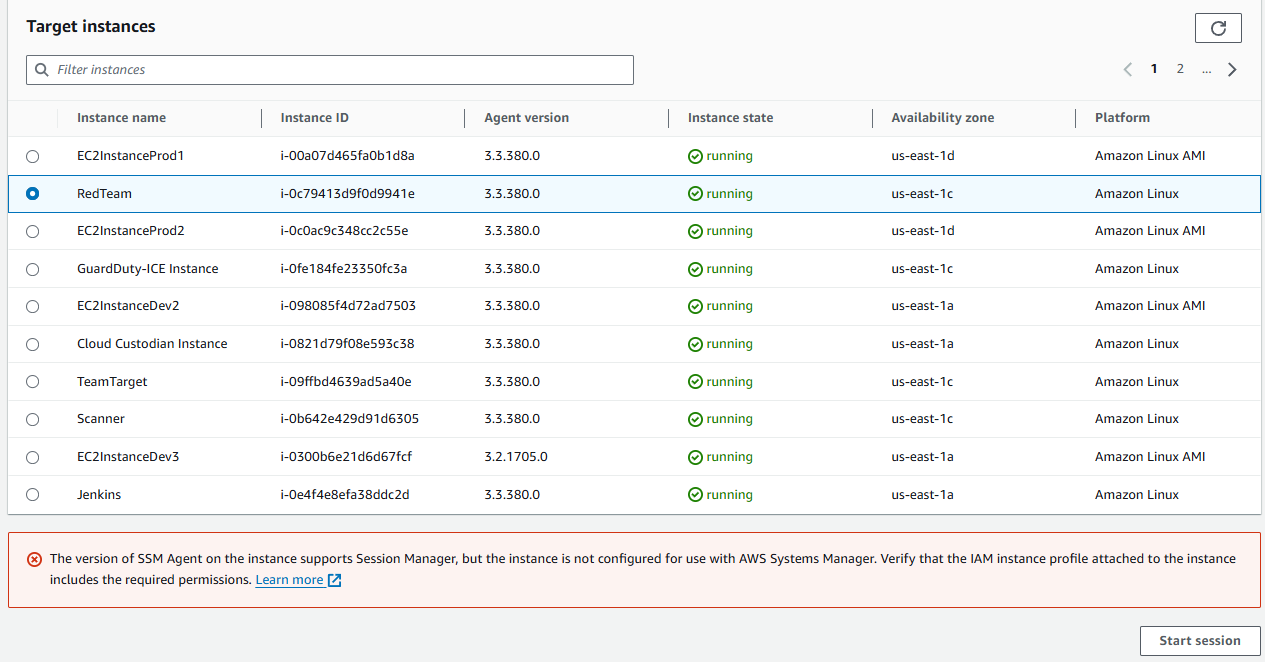
Select the Instance ID from earlier (that you stopped and started) by clicking on the radio button next to it. Then click Start session. This will open a shell (a session with that instance).
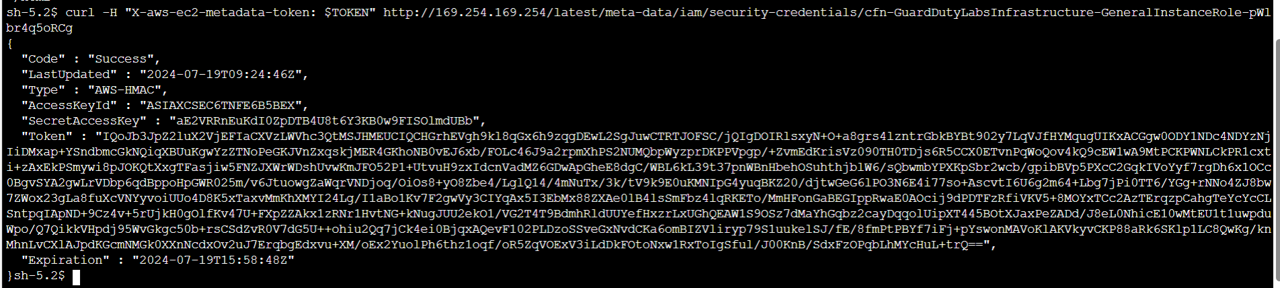
Run the following two commands and compare the access key ID to the one you copied down earlier to ensure it has changed. Make sure you replace the word “ROLE” at the end of the second command below with the “User name” or IAM role that you noted in step 4.
TOKEN=`curl -X PUT "http://169.254.169.254/latest/api/token" -H "X-aws-ec2-metadata-token-ttl-seconds: 21600"` && curl -H "X-aws-ec2-metadata-token: $TOKEN" http://169.254.169.254/latest/meta-data/
curl -H "X-aws-ec2-metadata-token: $TOKEN" http://169.254.169.254/latest/meta-data/iam/security-credentials/ROLE
- Compare the AccessKeyId in the response to the Access key ID you noted earlier to confirm the successful credential rotation (they should be different).
Answer: Different to the old AccessKeyID ASIAXCSEC6TNGZ6EZUUO:
For further reading, check out the example Incident Response Playbook for Credential Leakage/Compromise on AWS Samples: https://github.com/aws-samples/aws-incident-response-playbooks/blob/master/playbooks/IRP-CredCompromise.md
Investigate the compromised role session with Amazon Detective
Now that you have reviewed and remediated the GuardDuty finding “UnauthorizedAccess:IAMUser/MaliciousIPCaller.Custom”, further investigate what happened with this resource and look for any other related suspicious activity. You may opt to investigate with Detective before or after the preceeding steps.
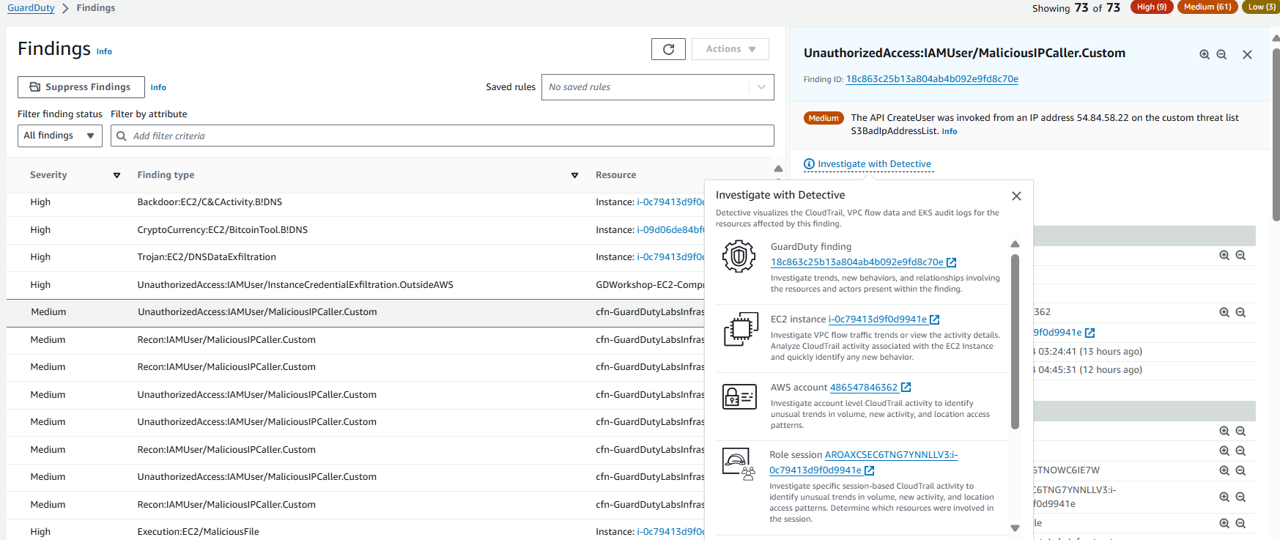
Return to Amazon GuardDuty and open the same finding again. Reference the steps earlier if you forget how to open the finding, UnauthorizedAccess:IAMUser/MaliciousIPCaller.Custom.
At the top of the overview panel, click the link that is labeled Investigate with Detective
In the investigate with Detective pop up, select the Role session.
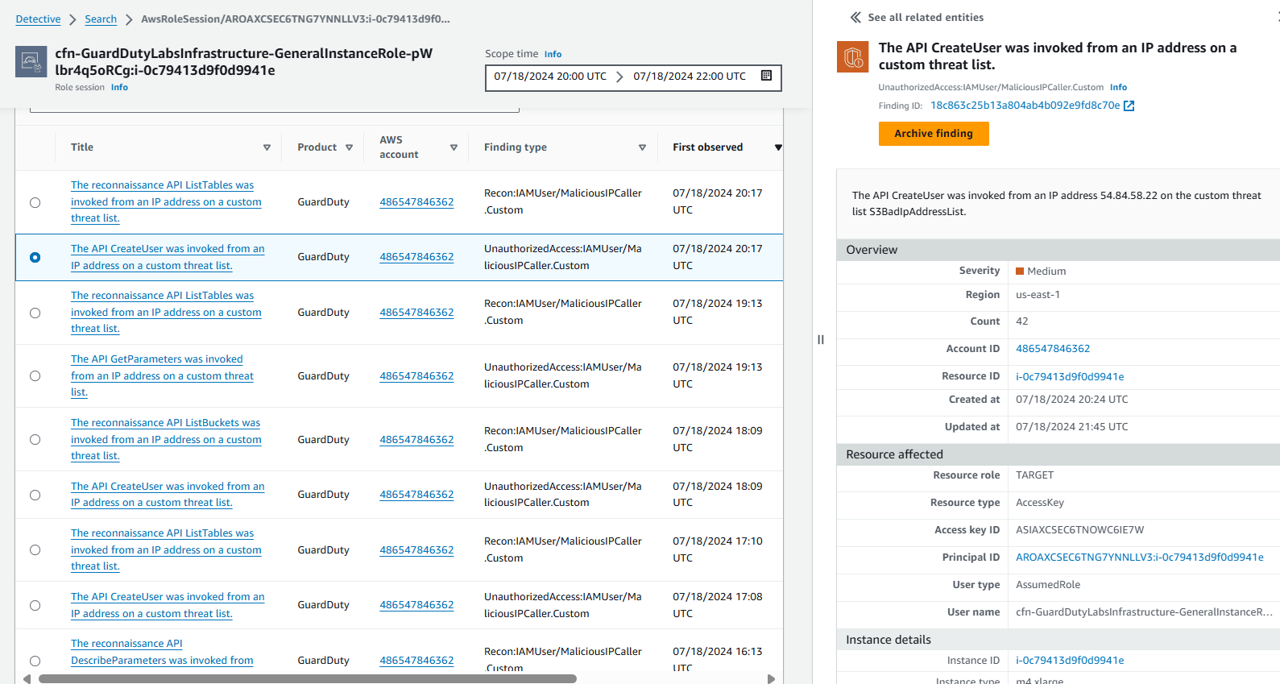
Now you should be on the Role session entity page in the Detective console with the UnauthorizedAccess:IAMUser/MaliciousIPCaller.Custom finding details on the right side of the screen. Proceed to answer some questions to accelerate you to root cause in your investigate.
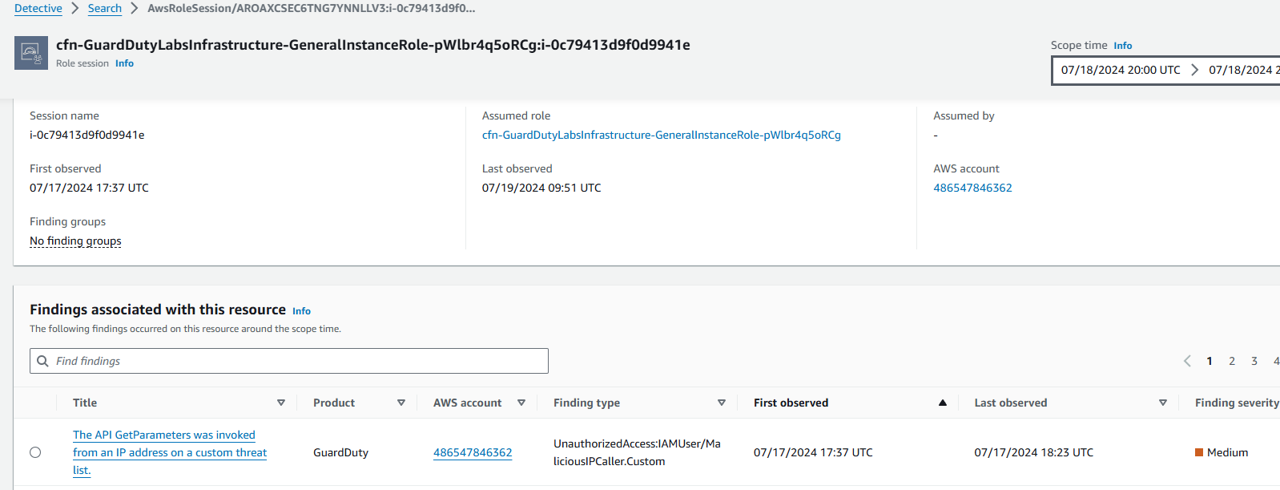
When did this occur?
The first panel in the entity overview is the Role session details. This gives you overview information about the role session related to our GuardDuty finding including associated account, assumed role, and first and last observed times.
Look at when the role session was First observed and Last observed. How does this correspond to when the GuardDuty finding was first created and updated? This information can help you narrow down a time frame for when this role was compromised.
GuardDuty and Detective time are not the same (GuardDuty console time is in laptop time, Detective time is in UTC). However, in GuardDuty finding json it is the same as Detective.
Start from 07/17/2024 17:44 UTC
In what account did this occur and what permissions did the assumed role have?
Notice the AWS account under Role session details. You should check if this account includes sensitive data or production workloads by looking it up in whatever configuration management database (CMBD) or other tool you use to track this. Continue to the next step.
Look for the link under Assumed role under Role session details and open it in a new tab. Optionally, review the findings associated with this role.
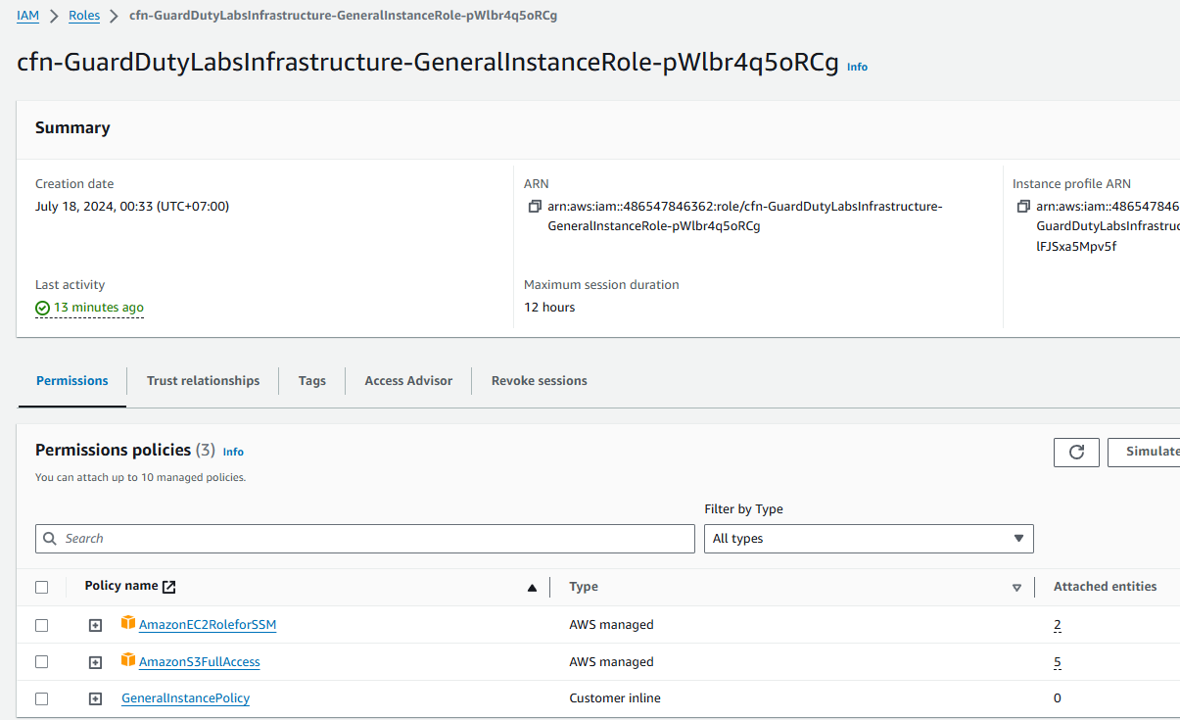
At the top of the page, find the link for AWS role under Role details. Open the link in a new tab. This will bring you to the IAM console.
From the IAM console you will be able to determine what permissions the role has, whether there are tags that help you identify what the role is used for, and gives you a direct pivot point from Detective to revoke sessions.
You can close the tab with the IAM console. Return to the tab with Detective opened to the AwsRoleSession. At the top of the page, you should see “Detective > Search > AwsRoleSession”.
What other findings are associated with this role session?
- Look at the Findings associated with this resource section. Review the findings in the order they were observed.
Was there an unusual spike in successful or failed API calls?
Scroll down to the Overall API call volume panel.
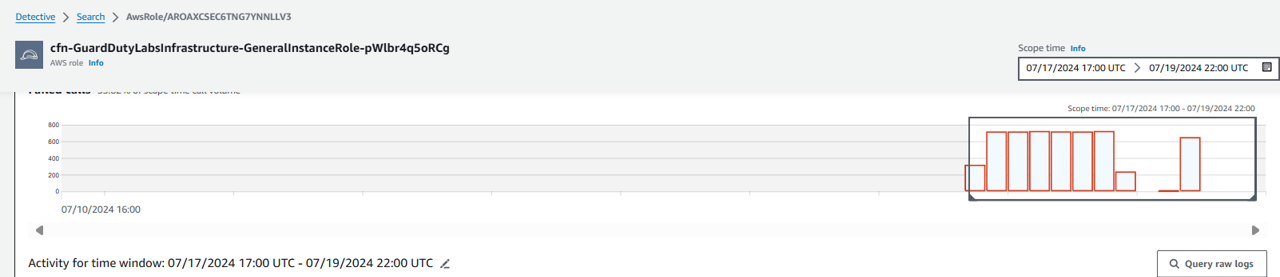
Click Display details for scope time to see more details.
Result:
 38. Under Successful calls, click on one of the bars of API calls exceeding the baseline (blue line). Then click Set time interval. This will update the Activity for time window.
Under the Activity for time window, expand the dropdowns to see what IP addresses made what API calls. You can also toggle to the tabs API method by service and Access Key ID.
Under Failed calls, click on one of the bars of API calls that failed. Then click Set time interval. This will update the Activity for time window. Review the API calls that failed.
Optionally, you may want to adjust the Scope time at the top of the page to determine if there was suspicious activity associated with this role before or after the GuardDuty finding?
Was there any other new behavior detected?
One avenue of investigation for a finding is to compare the activity during the finding scope time to activity that occurred before the finding was detected. Activity that has not been seen before might be more likely to be suspicious.
Some Amazon Detective profile panels highlight activity that was not observed during the time period before the finding. Several profile panels also display a baseline value to show the average activity during the 45 days before the scope time. Scope time is the summary of activity of an entity over time.
As more data is extracted into your behavior graph, Detective develops a more accurate picture of what activity is normal in your organization and what activity is unusual.
However, to create this picture, Detective needs access to at least two weeks of data. The maturity of the Detective analysis also increases with the number of accounts in the behavior graph.
The first two weeks after you activate Detective are considered a training period. During this period, profile panels that compare scope time activity to earlier activity display a message that Detective is in a training period.
During the trial period, Detective recommends that you add as many member accounts as you can to the behavior graph. This provides Detective with a larger pool of data, which allows it to generate a more accurate picture of the normal activity for your organization.
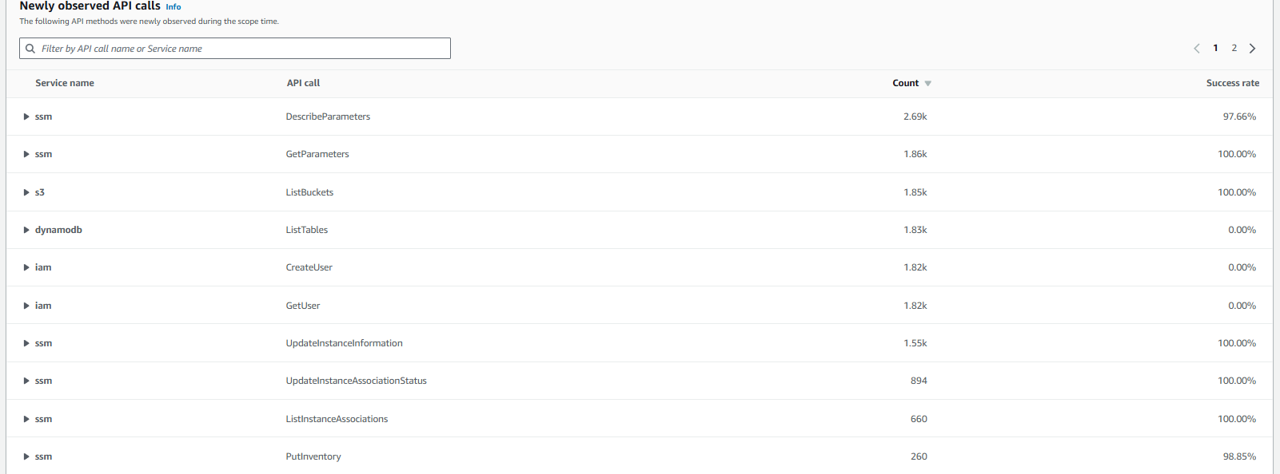
- At the top of the page, toggle to the New behavior tab. Although you will see several notifications on this page specifying “Panel in training”, take a few minutes to review various new behavior, including “Newly observed geolocations”, “Newly observed API calls”, “API calls with increased volume”, “Newly observed autonomous system organizations”, and “Newly observed user agents”.